Subaru Forester: Mirrors / Programming a New HomeLink Button
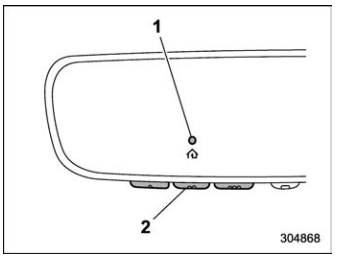
- Indicator Light
- HomeLink Buttons
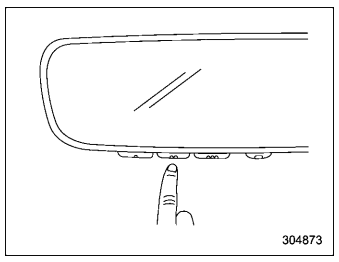
- Press and release the HomeLink button
that you would like to program. The
HomeLink indicator light will flash orange
slowly (if not, refer to “Erasing HomeLink
Buttons”).

Garage door opener remote
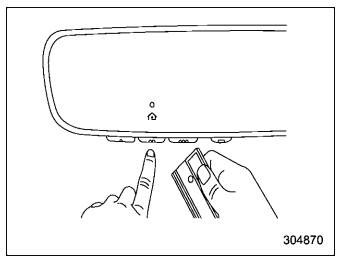
- Position the hand-held remote (garage
door opener remote) 1 to 3 inches (2 to 8
cm) away from the HomeLink button that
you would like to program.
NOTE
Some hand-held remotes (garage door opener remotes) may actually train better at a distance of 6 to 12 inches (15 to 30 cm). Keep this in mind if you have difficulty with the programming process.
- While the HomeLink indicator light is
flashing orange, press and hold the handheld
remote button. Continue pressing the
hand-held remote button until the
HomeLink indicator light changes from
orange to green. You may now release
the hand-held remote button.
NOTE
Some devices may require you to replace this “Programming a New HomeLink Button” step 3 with procedures noted in the “Gate Operator / Canadian Programming” section. Refer to “Gate Operator/Canadian Programming”.
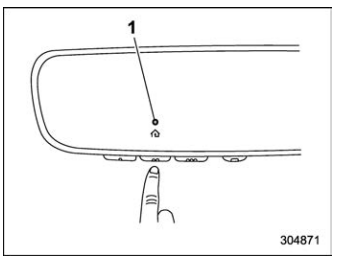
Indicator Light
- Press the HomeLink button that you
would like to program and observe the
indicator light.
- If the indicator light remains constant green, your device should operate when the HomeLink button is pressed. At this point, if your device operates, programming is complete.
- If the indicator light rapidly flashes green, firmly press, hold for two seconds and release the HomeLink button up to three times to complete the programming process. At this point if your device operates, programming is complete. If the device does not operate, continue with the next step of the programming instructions.
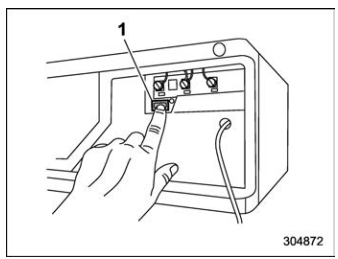
“Learn” button
- At the garage door opener motor,
(security gate motor, etc.) locate the
“Learn”, “Smart”, or “Program” button. This
can usually be found where the hanging
antenna wire is attached to the motor-head
unit (see the device’s manual to identify
this button). The name and color of the
button may vary by manufacturer.
NOTE
A ladder and/or second person may simplify the following steps.
- Firmly press and release the “Learn”,
“Smart”, or “Program” button. You now
have 30 seconds in which to complete step
- Return to the vehicle and firmly press,
hold for two seconds and release the
HomeLink button up to three times. At this
point programming is complete and your
device should operate when the HomeLink
button is pressed and released.
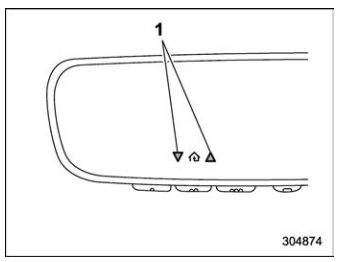
Status Indicators
- If status indicator arrows appear next to the indicator light, please refer to “Garage Door Two-Way Communication”
In the event that there are still programming difficulties or questions, additional HomeLink information and programming videos can be found at www.HomeLink.com and www.youtube.com/HomeLinkGentex. For Genie and Sommer garage door openers please go directly to the HomeLink website.

 Gate Operator/Canadian Programming
Canadian radio-frequency laws require
transmitter remote signals to “time-out”
(or quit) after several seconds of transmission,
which may not be long enough for
HomeLink to pick up the signal during
programming...
Other information:
Subaru Forester 2019-2026 Owners Manual: Unfastening the seatbelt
Button Push the release button of the center seatbelt buckle (on the left-hand side) to unfasten the seatbelt.NOTE When the seatback is folded down, it is necessary to disconnect the connector. Insert a tongue plate or other hard pointed object into the slot in the anchor buckle on the right-hand side and push it in...
Subaru Forester 2019-2026 Owners Manual: Replacing battery of access key fob
CAUTION When removing or reinstalling the access key fob cover, make sure that the plastic part does not come off or become misaligned. Battery: Button battery CR2032 or equivalent Release button Emergency key Take out the emergency key...
Categories
- Manuals Home
- Subaru Forester Owners Manual
- Subaru Forester Service Manual
- Reclining the seatback (if equipped)
- RAB warning light (if equipped)
- To activate/deactivate the X-MODE
- New on site
- Most important about car
Average vehicle speed
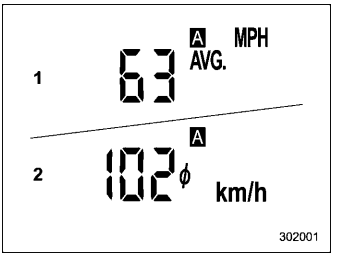
This display shows the average vehicle speed since the trip meter was last reset. Pressing the TRIP RESET switch toggles the display between the average vehicle speed corresponding to the A trip meter display and the average vehicle speed corresponding to the B trip meter display. When either of the trip meter displays is reset, the corresponding average vehicle speed value is also reset.