Subaru Forester: Child restraint systems / Installing forward facing child restraint
WARNING
- NEVER INSTALL A CHILD SEAT IN THE FRONT SEAT. DOING SO RISKS SERIOUS INJURY OR DEATH TO THE CHILD BY PLACING THE CHILD’S HEAD TOO CLOSE TO THE SRS AIRBAG.
- Before installing a child restraint system, be sure to confirm that the seatback is securely locked into place. Otherwise, in an accident, serious injury or death could result.
- Shake the seatback slightly to confirm
that it is securely locked into place.
- Check the red colored unlocking marker which is attached to the bottom of the lock release knob is not visible. For details, refer to “Folding down the rear seatback”.
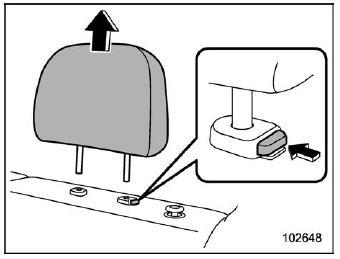
- Remove the head restraint of the rear
seating position where the child restraint
system is to be installed. For details, refer
to “Head restraints”.
CAUTION
Store the head restraint that has been removed in the cargo area. Avoid placing the head restraint in the passenger compartment to prevent it from being thrown around in the passenger compartment in a sudden stop or a sharp turn.
- For models with rear seat reclining mechanism, adjust the seatback to the upright position.
- Place the child restraint system in the
rear seating position.
WARNING
When you intend to install a child restraint system on the rear center seating position, if the child restraint system does not fit snugly against the contours of the rear center seat cushion, install the child restraint system on the window-side seating position to be safe. For details, refer to “Where to place a child restraint system”.
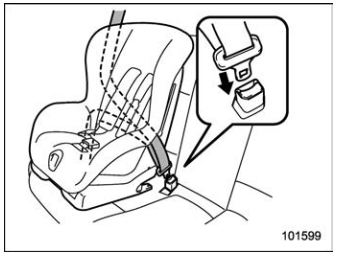
- Run the lap and shoulder belt through
or around the child restraint system following
the instructions provided by its manufacturer.
- When a child restraint system is installed on the rear center seating position, pass the rear center seatbelt through the belt guide properly. For details, refer to “Rear center seatbelt”.
- Insert the tongue plate into the buckle
until you hear a click.
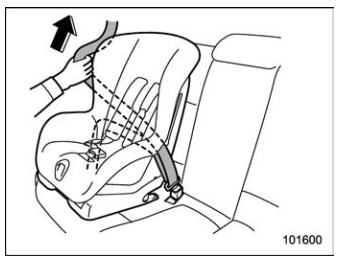
- Take up the slack in the lap belt.
- Pull out the seatbelt fully from the
retractor to change the retractor over from
the Emergency Locking Retractor (ELR) to
the Automatic Locking Retractor (ALR)
function. Then, allow the belt to rewind into
the retractor. As the belt is rewinding,
clicks will be heard which indicate the
retractor functions as ALR.
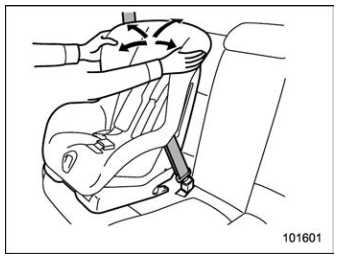
- Before having a child sit in the child restraint system, try to move it back and forth and right and left to check if it is firmly secured. Sometimes a child restraint system can be more firmly secured by pushing it down into the seat cushion and then tightening the seatbelt.
- Pull at the shoulder portion of the belt
to confirm that it cannot be pulled out (ALR
properly functioning).
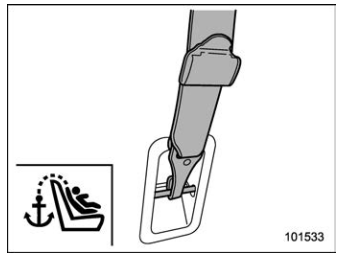
- Latch the top tether hook onto the
tether anchorage that is located behind the
rear seat and tighten the top tether firmly.
For additional instructions, refer to “Top
tether anchorages”.
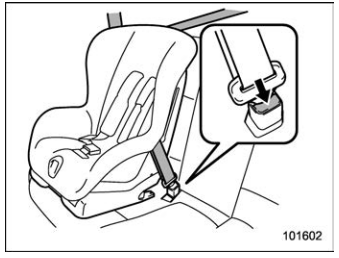
- To remove the child restraint system, press the release button on the
seatbelt
buckle and allow the belt to retract
completely. The belt will return to the
ELR mode.
Remember that the head restraint is not intended to be used at the lowest position (retracted position). Therefore, when the rear center seat is occupied (including when a child restraint system is installed) next time, be sure to raise the head restraint to the extended position.
NOTE
When the child restraint system is no longer in use, remove it and restore the ELR function of the retractor. That function is restored by allowing the seatbelt to retract fully.
 Installing a booster seat
If the booster seat makes contact with
the head restraint of the rear seating
position where the booster seat is to be
installed, raise the head restraint to the
extended position...
Other information:
Subaru Forester 2019-2026 Owners Manual: Brake system warning light (red)
This light illuminates with the parking brake applied while the ignition switch is in the “ON” position. It turns off when the parking brake is fully released. WARNING Driving with the brake system warning light on is dangerous. This indicates your brake system may not be working properly...
Subaru Forester 2019-2026 Owners Manual: Tire pressure monitoring system (TPMS) (U.S.-spec. models)
The tire pressure monitoring system provides the driver with the warning message indicated by sending a signal from a sensor that is installed in each wheel when tire pressure is severely low. The tire pressure monitoring system will activate only when the vehicle is driven...
Categories
- Manuals Home
- Subaru Forester Owners Manual
- Subaru Forester Service Manual
- Unlock using PIN Code Access
- If the passenger’s frontal airbag OFF indicator illuminates and the ON indicator turns off even when the front passenger’s seat is occupied by an adult
- Auto Start Stop warning light/Auto Start Stop OFF indicator light (yellow)
- New on site
- Most important about car
Outside temperature indicator
The outside temperature is displayed on the multi-function display (color LCD).
NOTE
The outside temperature indicator shows the temperature around the sensor. However, the temperature may not be indicated correctly or the update may be delayed in the following conditions. While parking or driving at low speeds When the outside temperature changes suddenly (example: when going in and out of an underground parking area or when passing through a tunnel) When starting the engine after being parked for a certain period of time The temperature unit cannot be changed.
